Getting started with Zillow Showcase listings is easy! Follow this step-by-step guide for a seamless activation. From selecting photographers and media choices to going live on the MLS, we’re here to help!
Showcase Activation Checklist Items:
Here are the steps you’ll need to complete to get started and take your first Showcase listing live. Complete each task by referring to the step-by-step instructions below.
- Confirm Login information
- Bookmark app.showingtimeplus.com
- Visit Settings on your profile
- Set up your agent profile
- Add your profile photo and brokerage photo (if applicable)
- Update Notifications information to receive updates
- Add team information (if applicable)
- Create your first listing
- Select media package options
- Schedule your media shooting date/time
- Select our photographer or add in your own photographer
- Receive your first media for Showcase
- Download your media to share with your MLS
- Review your photo carousel and update if necessary
- Review your featured rooms and update if necessary
- Share your interactive floor plan with your MLS
- Set the listing live on the MLS to set all information live on Zillow
Showcase Activation Checklist Items:Here are the steps you’ll need to complete to get started and take your first Showcase listing live. Complete each task by referring to the step-by-step instructions below.
- Confirm Login information
To access your Showcase account, login at app.showingtimeplus.com. This is where you’ll use your email address and password combination.

- Bookmark app.showingtimeplus.com

- Visit Settings on Your Profile
You can find your settings on the upper right of your home screen. Once logged in, locate your agent icon at the top right corner. Access Settings by clicking the down arrow, and select “Settings.”

- Set Up Your Agent Profile
Edit the content that will appear on your Showcase listings, including your contact information, brokerage and logos.

- Add Your Profile Photo and Brokerage Photo (if applicable)

Click “Save updates” on the upper right of the Agent information screen to preserve your changes.

Update Notifications to Receive Updates
To make changes to your Notifications display name or mobile number, click the “Edit” button located in the row for the item you want to change.


- Add Team Information (if applicable)
If you’re running a team, this tab is where you can create a team, add members to your team and regulate their access to Showcase. To create a team, start by clicking “Create team.”

You’ll then identify a team name and select how much visibility the members of the team will have into each other’s listings. Click “Create” to add your team.

Once your team is created, you can edit details about your team and add or remove members in the Teams tab. Click the three dots on the upper right of the team box to add members or edit settings.


- Create Your First Listing
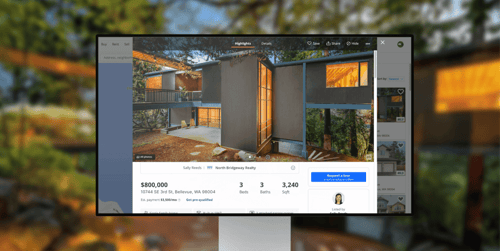
To create a listing, start at your home page, which is the default screen you’ll see when logging in. This page provides a quick look at all your current listings, the status of the media you’ve ordered for that listing and the Showcase status of every listing. When it’s time to create or upgrade a new Showcase listing, start by clicking the “+ New Listing” button on the upper right of the home screen.
To create a new Showcase listing, input the location address in the search bar or add it manually by clicking “+Add address manually.” Once you’ve entered the address, confirm the location and then identify the team and agent who should be used for this particular listing. These details are required to ensure your payment options and your profile on the listing are both routed properly.
Please Note: The listing agent should match the same information identified and shared by the MLS to avoid compliance issues.
Once you’ve made these selections, click “Next” to advance to media options. - Select Media Package Options
Options include:
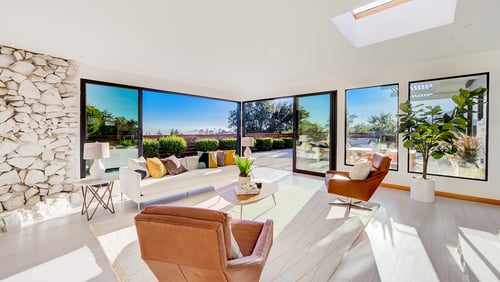
Essentials+ package with interior/exterior photos, high-res floor plan, and a virtual tour and interactive floor plan.
Premium+ package, including all of the same media from Essentials+ plus social reel highlight video, drone photos and virtual twilight.
A La Carte allows you to order media features on a case-by-case basis. Prices of these packages will vary depending on your area and availability.

Once you’ve selected your package, click “Next Step” to move forward.
- Schedule Your Media Shoot Date/Time
Once your package and photographer options are selected, select a date and time from the available options on the calendar displayed. Click “Next Step” within 15 minutes to avoid losing your selected slot.
Please Note: If a shoot is canceled or rescheduled less than 24 hours prior to the shoot, a $50 rescheduling fee will be automatically charged. Please notify our team of your need to reschedule at least 24 hours in advance.

Next, add access details so the photographer knows how to get into the property at the time of the shoot. You will also identify who will be present at the shoot and can provide additional notes for the photographer. Click “Next Step.”

- Select our Photographer or Add Your Own Photographer
You can use one of our existing team of photographers, or you can opt to have a photographer you’re already familiar with to do the shoot. All current Showcase photographers are trained and certified in the necessary media requirements and equipment. If you select to use your own photographer, our team will provide that person with the additional requirements needed to ensure your media package is created with the highest quality.

If you choose to use another photographer, you'll need to give us more information about your chosen photographer. Our team will contact them about the technical needs to create a Showcase listing and how they should manage and share the media with you once complete.

- Receive Your First Media for Showcase
Once your shoot is complete and your media is delivered, all this media will be available on the listing from your home page and visible on the Listing Media tab. This is where your photographer will upload all the media from your shoot for easy access.
- Download Your Media to Share with Your MLS
This tab is also where you can easily access and download the media to be shared with your MLS.

Showcase Tab
Once the media is delivered, you’ll find the initial setup for your Showcase listing within the Showcase tab from your listing. This includes your photo carousel, featured rooms and interactive floor plan. To update the selection and order of the carousel or rooms, click “Edit Listing” to begin making changes before you take the listing live on Zillow.

- Review Your Photo Carousel and Update if Necessary
Showcase’s AI will automatically select three photos for your listing carousel, but you can change the selection and order of the carousel or add additional photos if desired.
- Review your Featured Rooms and Update if Necessary
Showcase AI will also select your featured rooms. These can then be updated with different featured photos and reordered to suit your needs, depending on which rooms you want to highlight earlier in the listing.
- Share Your Interactive Floor Plan with Your MLS
Once you’ve finalized your choices, share the link for the interactive floor plan (if available) to your MLS. - Set the Listing Live on the MLS
The last step is to finalize your media and information on the MLS and set that to go live. The live MLS listing will set your Showcase listing to “active” on Zillow as well.
Congratulations! You’ve just completed your first Showcase listing. Save this step-by-step for future reference, and for a more detailed, step-by-step tutorial, visit the Showcase Getting Started Guide.